

Last Update: November 6, 2025
BY eric
eric
Keywords
If you've recently updated Windows and suddenly can't preview PDF files in File Explorer, you're not alone. The frustrating message The file you are attempting to preview could harm your computer. If you trust the file and the source you received it from, open it to view its contents has been plaguing users across various Windows versions, particularly affecting files stored on network drives or downloaded from the internet.
This comprehensive guide will walk you through multiple solutions to restore your file preview functionality while maintaining system security.
Understanding the Root Cause
The preview blocking issue stems from Microsoft's enhanced security measures implemented in recent Windows updates. The operating system now treats files from "unknown" or "untrusted" sources with increased caution, which includes:
- Documents downloaded from the internet or that haven't been explicitly marked as safe
- Files stored on network drives and shared folders
While this enhanced security is well-intentioned, it significantly impacts productivity for users who regularly work with files from network shares or legitimate internet sources.
Common Scenarios Where This Error Occurs
Downloaded Files
Files downloaded from the internet often carry a "Mark of the Web" (MotW) attribute that triggers Windows' security mechanisms, preventing preview functionality even for legitimate documents.
For example, downloading a PDF from a website may result in the preview error:
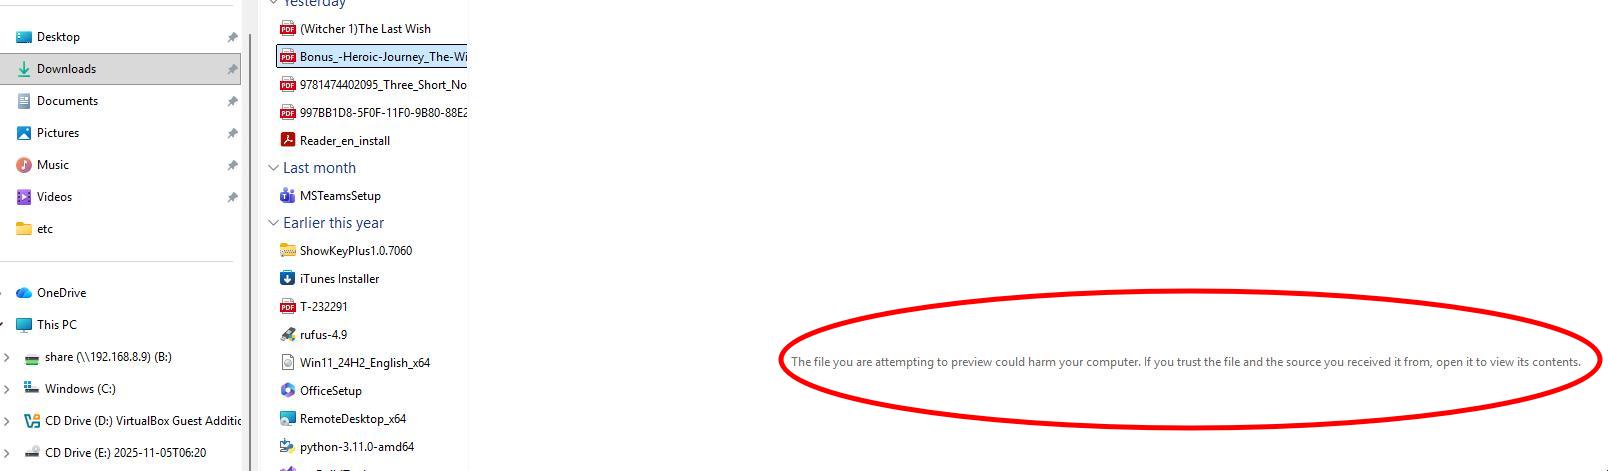
Because Windows flags the file as potentially unsafe, the preview pane is disabled.
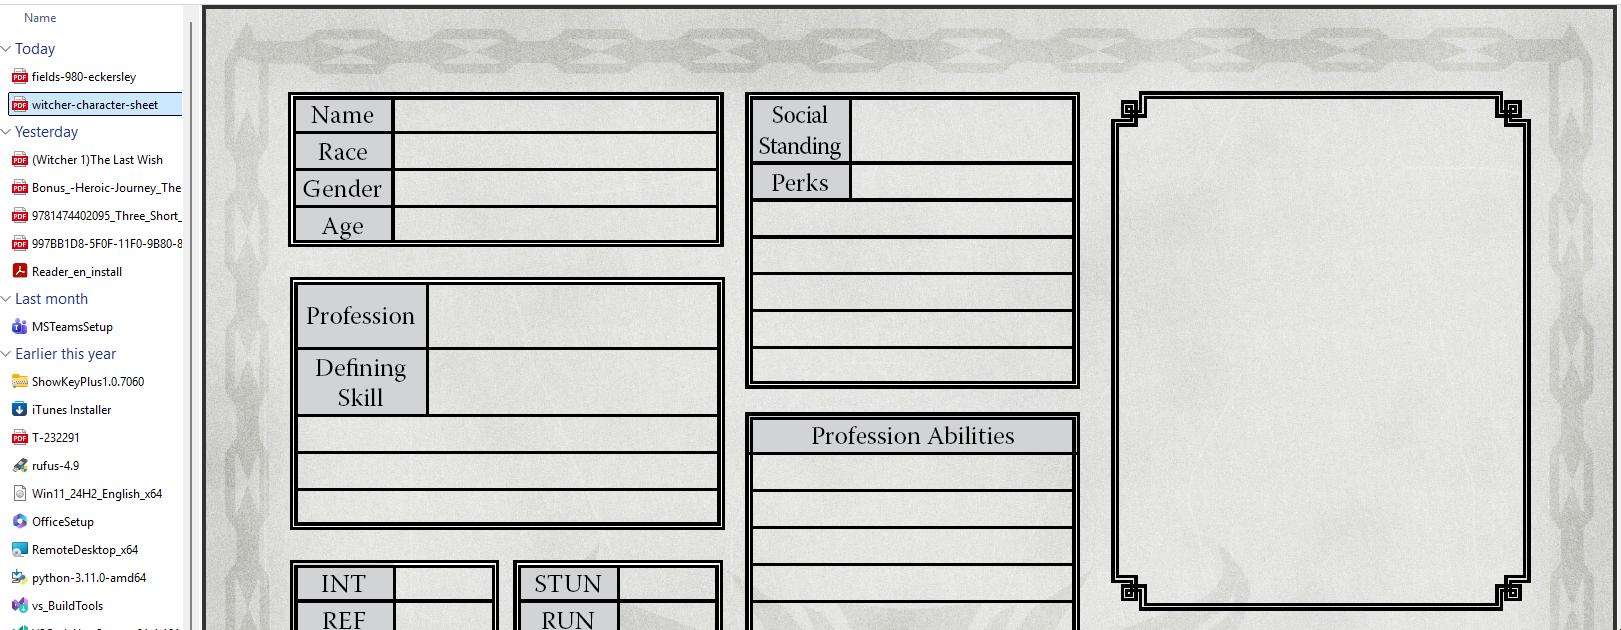
So in order to preview the file, we need to ask the operating system to unblock it. After unblocking the file, the preview works as expected:
Detailed Steps to Unblock Downloaded Files
For files downloaded from the internet, Windows applies a security attribute that can be removed manually.
Manual Unblocking Process
- Right-click the problematic file
- Select Properties from the context menu
- In the General tab, look for the Security section at the bottom
- Check the Unblock checkbox if present
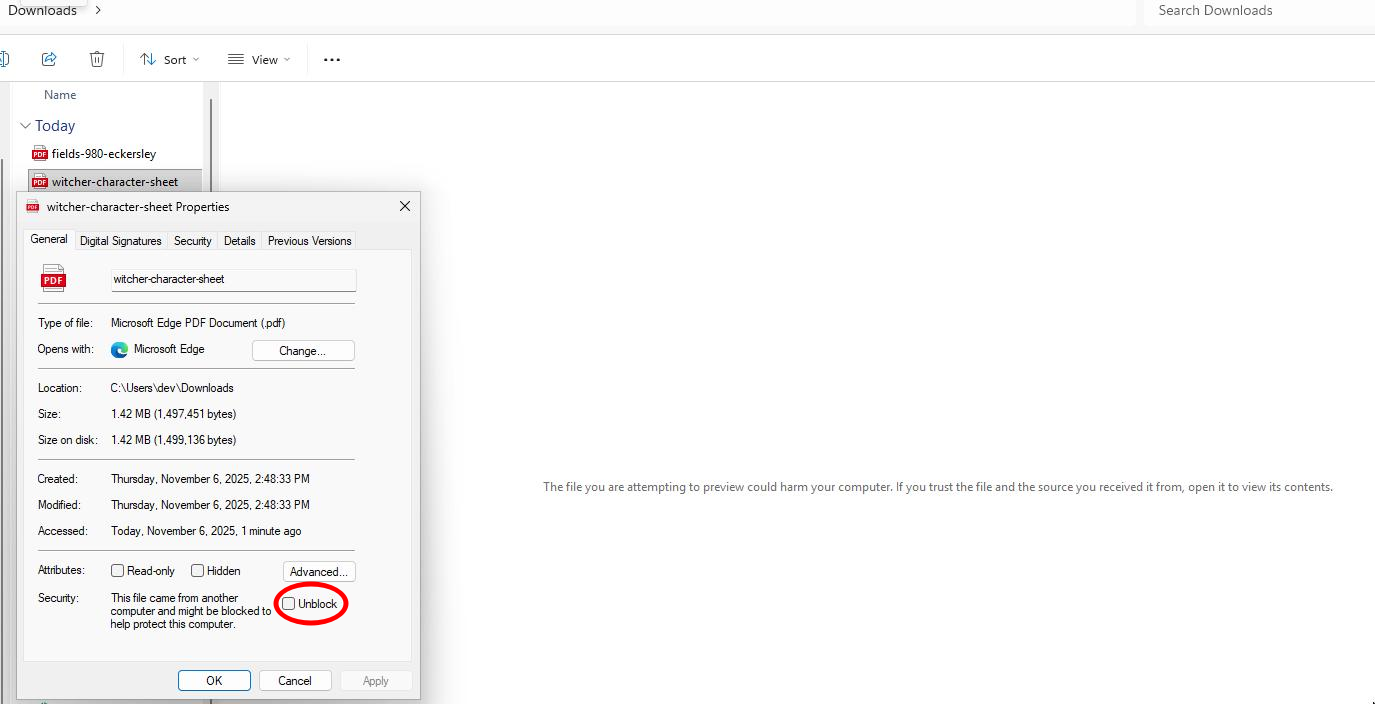
- Click OK to apply changes
Bulk Unblocking with PowerShell
No way we need to manually unblock each file one by one. You can use PowerShell to automate this process.
To unblock multiple files simultaneously:
# Unblock all files in a specific directory
Get-ChildItem "C:\Downloads\*.pdf" | Unblock-File
# Unblock files recursively in subdirectories
Get-ChildItem "C:\Downloads" -Recurse | Unblock-File
# Unblock specific file types
Get-ChildItem "C:\Downloads" -Recurse -Include "*.pdf", "*.docx", "*.xlsx" | Unblock-File
Group Policy for Files Unblocking
Still too much trouble to run the script every time? You can configure Group Policy to unblock files forever.
Group Policy Editor is only available in Windows Pro, Enterprise, and Education editions.
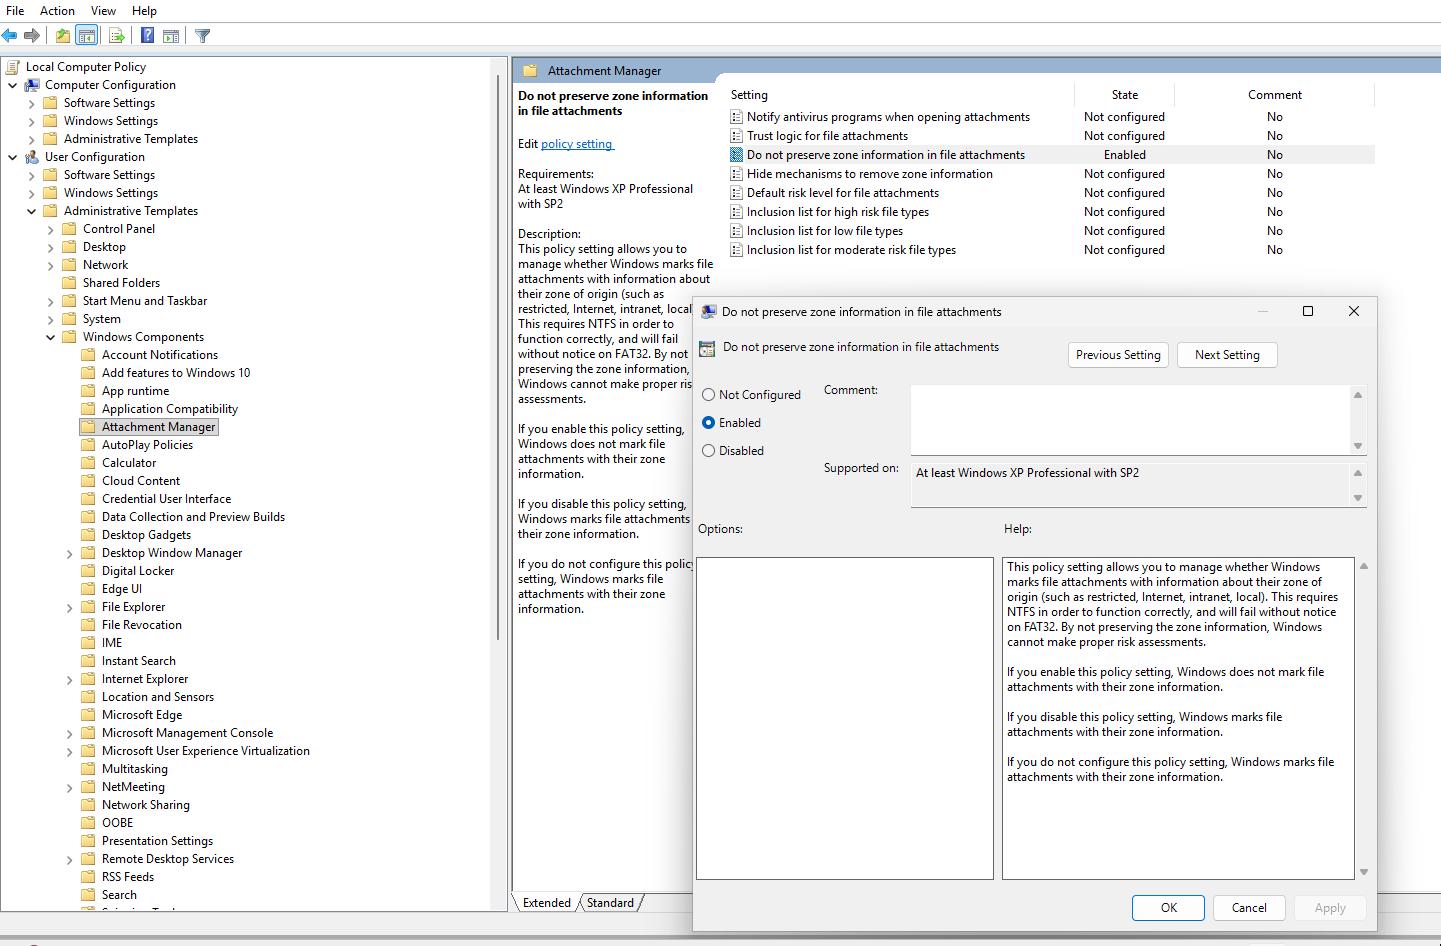
To configure Group Policy for file unblocking:
- Press
Windows + R, typegpedit.msc, and press Enter. - Navigate to User Configuration > Administrative Templates > Windows Components > Attachment Manager.
- Locate the policy named "Do not preserve zone information in file attachments".
- Set this policy to Enabled.
For those using Windows Home edition, you can achieve the same effect by modifying the registry:
[HKEY_CURRENT_USER\Software\Microsoft\Windows\CurrentVersion\Policies\Attachments]
"SaveZoneInformation"=dword:00000001
If that still doesn't work, you can try the following PowerShell (Run As Administrator) script:
# ===========================================
# Enable "Do not preserve zone information in file attachments"
# ===========================================
# Requires running as Administrator
if (-not ([bool](net session 2>$null))) {
Write-Host "❌ Please run this script as Administrator!" -ForegroundColor Red
exit
}
# Registry path for Attachment Manager policy
$regPath = "HKLM:\SOFTWARE\Microsoft\Windows\CurrentVersion\Policies\Attachments"
# Ensure key exists
if (-not (Test-Path $regPath)) {
New-Item -Path $regPath -Force | Out-Null
}
# Set "SaveZoneInformation" to 1 (Do not preserve)
# Value meanings:
# 1 = Do not preserve zone information (Enabled)
# 2 = Preserve zone information (Disabled)
Set-ItemProperty -Path $regPath -Name "SaveZoneInformation" -Value 1 -Type DWord -Force
Write-Host "✅ 'Do not preserve zone information in file attachments' is now ENABLED (zone info will NOT be preserved)."
Network Drive Files
This scenario is especially common in professional or corporate environments, where teams often organize their daily workflows around shared network drives. These shared folders serve as central repositories for documents, project files, and resources, allowing multiple employees to access, collaborate, and update information in real time.
However, the changes from above on your Windows may not be enough for you to prevent this issue for files stored on network drives. This is because Windows classifies network locations differently in its security zones.
The most common scenario involves accessing PDF files stored on:
- Company file servers (
//fileserver,//dataserver) - IP-based network shares (
//10.0.0.3,//192.168.1.100)
Solution: Add Network Locations to Trusted Sites
This is the most effective solution for network drive files and addresses the core security zone configuration issue.
Step-by-Step Process
-
Open Internet Options
- Press
Windows + Rto open the Run dialog - Type
inetcpl.cpland press Enter - Alternatively, search for "Internet Options" in the Start menu
- Press
-
Access Security Settings
- Navigate to the Security tab
- Select Trusted sites from the zone list
- Click the Sites button
-
Configure Trusted Sites
- Important: First, uncheck "Require server verification (https:) for all sites in this zone"
- Add your network locations using these formats:
file:\\fileserver
file:\\dataserver
file:\\10.0.0.3
file:\\192.168.1.100
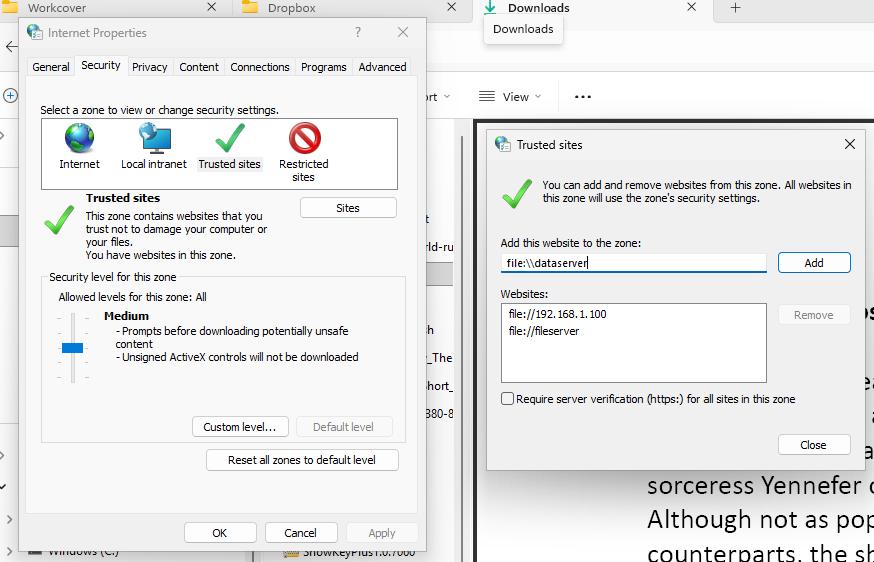
- Apply Changes
- Click Add for each network location
- Click Close and then OK to save changes
- Restart File Explorer or reboot your computer
PowerShell Automation Script
Aternatively, for IT administrators managing multiple machines, here's a PowerShell script to automate the trusted sites configuration (for the current logged-in user):
# ===========================================
# Add multiple network paths to Trusted Sites zone (Zone 2)
# and disable "Require server verification (https:)" checkbox
# ===========================================
# List of network paths
$sharedPaths = @(
"file:\\fileserver",
"file:\\dataserver",
"file:\\10.0.0.3"
)
# --------------------------
# Disable "Require server verification (https:)"
# --------------------------
$zoneKey = "HKCU:\Software\Microsoft\Windows\CurrentVersion\Internet Settings\Zones\$zone"
$flagsValue = (Get-ItemProperty -Path $zoneKey -Name "Flags" -ErrorAction SilentlyContinue).Flags
if ($null -eq $flagsValue) { $flagsValue = 0 }
# Bit 0 (0x1) = Require server verification (https:)
# Clear this bit
$newFlags = $flagsValue -band (-bnot 0x1)
Set-ItemProperty -Path $zoneKey -Name "Flags" -Value $newFlags -Force
Write-Host "`n🔓 Disabled 'Require server verification (https:)' for $zoneName zone."
# Trusted Sites zone number
$zone = 2
$zoneName = "Trusted Sites"
# Registry base path
$regBase = "HKCU:\Software\Microsoft\Windows\CurrentVersion\Internet Settings\ZoneMap\Domains"
foreach ($path in $sharedPaths) {
# Extract domain or hostname
if ($path -match "\\\\([\w\.-]+)") {
$domain = $matches[1]
} elseif ($path -match "file://([\w\.-]+)") {
$domain = $matches[1]
} else {
Write-Host "⚠️ Skipped invalid path format: $path" -ForegroundColor Yellow
continue
}
# Create registry key for the domain
$domainKey = Join-Path $regBase $domain
if (-not (Test-Path $domainKey)) {
New-Item -Path $domainKey -Force | Out-Null
}
# Assign zone 2 (Trusted Sites)
New-ItemProperty -Path $domainKey -Name "*" -Value $zone -PropertyType DWord -Force | Out-Null
Write-Host "✅ Added $domain to $zoneName zone."
}
Write-Host "🎯 Completed successfully!"
For All Users:
# ===========================================
# Add multiple network paths to Trusted Sites zone (Zone 2) for all users
# and disable "Require server verification (https:)" checkbox
# ===========================================
# Requires running as Administrator
if (-not ([bool](net session 2>$null))) {
Write-Host "❌ Please run this script as Administrator!" -ForegroundColor Red
exit
}
# List of network paths
$sharedPaths = @(
"file:\\fileserver",
"file:\\dataserver",
"file:\\10.0.0.3"
)
# Trusted Sites zone number
$zone = 2
$zoneName = "Trusted Sites"
# Registry base path for all users (HKLM)
$regBase = "HKLM:\SOFTWARE\Microsoft\Windows\CurrentVersion\Internet Settings\ZoneMap\Domains"
foreach ($path in $sharedPaths) {
# Extract domain or hostname
if ($path -match "\\\\([\w\.-]+)") {
$domain = $matches[1]
} elseif ($path -match "file://([\w\.-]+)") {
$domain = $matches[1]
} else {
Write-Host "⚠️ Skipped invalid path format: $path" -ForegroundColor Yellow
continue
}
# Create registry key for the domain
$domainKey = Join-Path $regBase $domain
if (-not (Test-Path $domainKey)) {
New-Item -Path $domainKey -Force | Out-Null
}
# Assign zone 2 (Trusted Sites)
New-ItemProperty -Path $domainKey -Name "*" -Value $zone -PropertyType DWord -Force | Out-Null
Write-Host "✅ Added $domain to $zoneName zone for all users."
}
# --------------------------
# Disable "Require server verification (https:)"
# --------------------------
$zoneKey = "HKLM:\SOFTWARE\Microsoft\Windows\CurrentVersion\Internet Settings\Zones\$zone"
$flagsValue = (Get-ItemProperty -Path $zoneKey -Name "Flags" -ErrorAction SilentlyContinue).Flags
if ($null -eq $flagsValue) { $flagsValue = 0 }
# Bit 0 (0x1) = Require server verification (https:)
# Clear this bit
$newFlags = $flagsValue -band (-bnot 0x1)
Set-ItemProperty -Path $zoneKey -Name "Flags" -Value $newFlags -Force
Write-Host "`n🔓 Disabled 'Require server verification (https:)' for $zoneName zone (all users)."
Write-Host "🎯 Completed successfully!"
What Can We Do if None of Above Works?
Alright, let's explore alternative PDF handlers, because maybe you have some PDF viewer issues.
Microsoft Edge as PDF Handler
- Right-click any PDF file
- Select Open with > Choose another app
- Select Microsoft Edge
- Check Always use this app to open .pdf files
- Test file preview functionality
Adobe Acrobat Reader Configuration
If you prefer Adobe Acrobat Reader:
- Open Adobe Acrobat Reader
- Go to Edit > Preferences
- Select General from the left panel
- Check Enable PDF thumbnail previews in Windows Explorer
- Restart File Explorer
Registry Modifications
Warning: Always backup your registry before making changes.
To reset preview handlers:
[HKEY_LOCAL_MACHINE\SOFTWARE\Microsoft\Windows\CurrentVersion\PreviewHandlers]
Delete problematic preview handler entries and restart the system.
Final Thoughts
The "could harm your computer" preview error, while frustrating, reflects Microsoft's commitment to system security. The solutions outlined above provide multiple approaches to restore preview functionality while maintaining appropriate security levels.
For most users working with network drives, adding trusted sites is the most effective long-term solution. Downloaded files can be handled through the unblock process, either manually or via PowerShell scripts.
Remember that these configurations balance convenience with security. Always ensure you trust the sources and files you're working with, and consider implementing additional security measures in enterprise environments.
By following this guide, you should be able to restore PDF preview functionality in Windows File Explorer while maintaining awareness of the security implications involved.
Latest Articles

The 4 GB Card You Already Own Can Reason Now
June 17, 2026

The Small Model's Real Job Is Dispatch, Not Work
June 15, 2026
What a Native Tool Call Actually Is
June 15, 2026


How a Coding Agent Actually Writes Code
June 13, 2026
Previous Article

Nov 12, 2025
Solving the .NET Build Hang on Linux with Docker
Next Article

Nov 03, 2025
Comments (0)
Leave a Comment