

Last Update: February 10, 2026
BY eric
eric
Keywords
Nothing strikes fear into a network administrator's heart quite like a dead router during peak business hours. What started as a routine internet outage on a Wednesday afternoon turned into a three-day odyssey through hardware failures, vendor limitations, and configuration nightmares that taught me invaluable lessons about network resilience and the hidden complexities of modern networking equipment.
The Initial Disaster: When Redundancy Fails
Our office's Meraki router had been rock-solid for years. When the internet went down Wednesday morning, I initially wasn't concerned – these things happen, and our ISP usually resolves fiber issues quickly. But as minutes turned to hours, and our backup USB mobile data modem showed no signs of life in the Meraki dashboard, I knew this wasn't a typical outage.
The Investigation Begins
Arriving on-site, the symptoms were clear but puzzling:
- Solid amber LED on the Meraki router
- No WAN link lights on the fiber optic connection
- No activity from the USB mobile data modem
- All ethernet ports and USB appeared powerless
The smoking gun came when I connected the WAN cable directly to a switch – instant link lights. The fiber wasn't the problem; the router was dead.
# Quick fiber connectivity test
# Connect WAN cable directly to switch/laptop
# If link lights appear immediately = router hardware failure
# If no link lights = ISP/fiber issue
To confirm my suspicions, I grabbed a consumer-grade home router from our emergency stash. One connection attempt later, we had internet – but with constant WiFi dropouts serving 30+ devices. Not exactly a sustainable business solution.
The Search for an Emergency Replacement
Here's where the real challenge began. Meraki products come with lifetime warranty, but RMA (Return to Manufacturer Authorization) processes don't respect business emergencies. Even in the best-case scenario, we were looking at several days without proper networking infrastructure.
Why Finding Business-Grade Alternatives Is Hard
The requirements seemed simple enough:
- Available immediately (no ordering delays)
- Cost-effective for temporary use
- Support 30+ concurrent devices
- Business-grade security and firewall features
- Compatible with our PPPoE internet connection
After researching our options, we settled on:
- Ubiquiti Cloud Gateway Ultra (UCG-ULTRA) for routing
- Ubiquiti U7 Lite WiFi 7 for wireless access
- 24V DC 30W PoE Injector for powering the access point
The Ubiquiti Configuration Nightmare
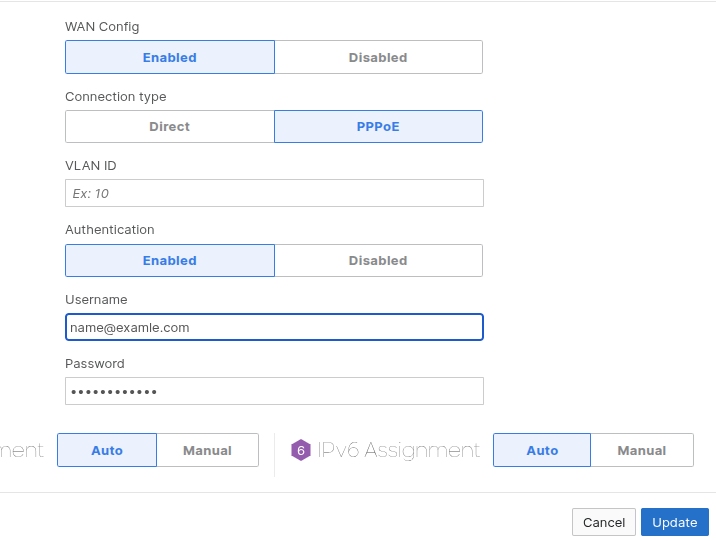
PPPoE Connection Struggles
What should have been a straightforward setup turned into hours of frustration. The initial PPPoE configuration simply refused to work – the router kept displaying "no internet found" regardless of what I tried.
# Initial PPPoE Configuration Attempt
Connection Type: PPPoE
Username: [ISP_USERNAME]
Password: [ISP_PASSWORD]
VLAN ID: [if required by ISP]
MTU: 1500 (or ISP-specific value)
Suspecting a faulty unit, I implemented a workaround by converting Port 4 to a WAN port and using the Ubiquiti router as a client of our temporary home router. This bridged connection worked, proving the hardware was functional.
The Mysterious PPPoE Success
Then something inexplicable happened – after extensive testing and configuration changes, the direct PPPoE connection suddenly started working. No clear explanation, no obvious trigger. Sometimes networking equipment just needs time to "settle in," though this isn't documented anywhere in the manual.
WiFi Access Point Woes
The networking gods weren't finished with us yet. Our 24V PoE injector turned out to be completely dead – it couldn't power the WiFi access point or even our office VoIP phone.
Emergency solution: We sourced a TP-LINK 8-port PoE Gigabit Switch, which successfully powered the U7 Lite (confirmed by the characteristic blue LED ring).
UniFi Console Connection Issues
The WiFi access point refused to find the UniFi console during initial setup, consistently failing at exactly 2 minutes and 53 seconds with a "setup was disrupted" error message.
Resolution: A factory reset of the access point solved this issue entirely. Sometimes the simplest solutions are the most effective.
UniFi Settings for the Business Workflow
Beyond the basic setup, we ran into some extra settings we needed for our specific business workflow. With our old Meraki router, we had this sweet IP-based access control for port-forwarding. It let us get to our in-premise NAS drive right from the cloud server.
Now, this Ubiquiti Cloud Gateway Ultra router? It seems like it's got that functionality, but honestly, we just couldn't get it to work (I assumed it was my fault entirely). Other than that, the UniFi dashboard itself can feel a bit overwhelming, too. There's info everywhere, but finding exactly what you need? That's another battle entirely.
It has some nice business features though. Take VPNs, for example:
- You can set up WireGuard, OpenVPN, and L2TP servers. I hit a snag trying to create the OpenVPN server though; it kept spitting out an error with a cryptic "default" message.
- Site-to-site VPN. But didn't test it.
I also had a few headaches setting up fixed IP addresses for certain devices. The error message kept saying the addresses were "already assigned," which was pretty frustrating. But hey, these weren't critical blockers for us, as we're just biding our time for new replacement devices from Cisco anyway. Just a couple more days to wait!
Meraki RMA: When "Plug and Play" Isn't
Friday arrived with our RMA replacement Meraki router. The promise of Meraki's cloud management is simple: swap the hardware, and everything should work seamlessly. Reality had other plans.
The PPPoE Déjà Vu
Despite using the correct credentials via the local configuration page (http://192.168.0.1), the new Meraki router refused to establish a PPPoE connection. The status LED remained stubbornly amber.
# Meraki Local Configuration Access
URL: http://192.168.0.1
Username: [Router Serial Number]
Password: [Leave blank for initial setup]
USB Modem Drama
I still had that USB modem—definitely not the best 4G mobile data modem that Meraki supports, let's just say that. It's temperamental. Sometimes it's a contact issue where it won't even recognize the SIM card. Other times, the SIM registers, but it barely grabs a signal.
So, here was the situation:
- The new router couldn't connect to the internet through the main WAN port.
- It couldn't connect through the ethernet ports as a client of the Ubiquiti Cloud Gateway.
- And it definitely wasn't connecting through that USB modem.
Talk about a triple failure, right?
Luckily, after fidgeting with the USB modem on a PC for a while, I finally got an internet connection out of it. My hands were actually shaky as I plugged it back into the router. I was literally praying it would keep working once it was connected. And then—the miracle happened. The router light went from that dreaded amber to a solid, beautiful white. Voilà!
Multiple WAN Port Strategy
With our temperamental USB mobile data modem providing intermittent connectivity, I configured Port 4 as WAN 2. Using the Ubiquiti router as an intermediate gateway (WAN 2 → Ubiquiti → Internet), we achieved connectivity through DHCP. Another milestone.
The breakthrough came when I switched WAN 2 from DHCP to PPPoE and connected the WAN 2 port with the ISP cable while maintaining the connection through the USB modem. Suddenly, the direct ISP connection worked perfectly.
The VLAN Gotcha That Almost Broke Everything
With internet connectivity restored, I assumed our troubles were over. Wrong. All ethernet-connected devices – computers, printers, phones – couldn't reach the network. WiFi devices worked perfectly.
The Diagnostic Process
The printer's error message provided the crucial clue: "Cannot connect to DHCP server." This suggested a Layer 2 connectivity issue rather than a DHCP configuration problem.
The VLAN Configuration Trap
Consulting various resources (including AI assistants), the consensus pointed to VLAN configuration issues. In the Meraki dashboard's "Per-port VLAN Settings" every ethernet port was configured to "Drop Untagged Traffic" instead of the expected "VLAN 1 (Default)."
Go to the VLAN setting page, and find the "Per-port VLAN Settings" section:
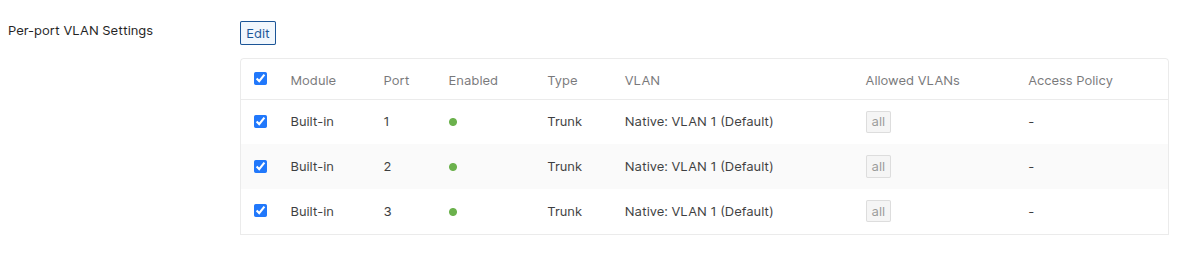
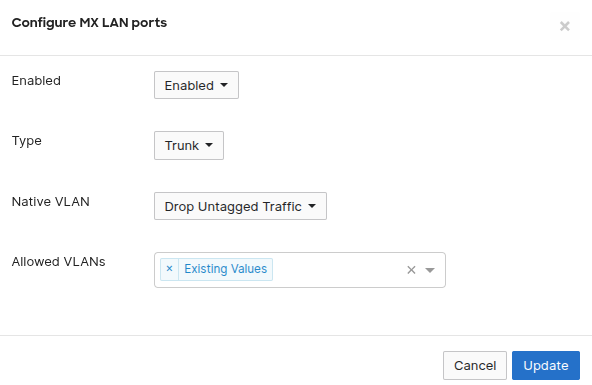
# Problematic VLAN Configuration
Port 1-8: Drop Untagged Traffic ❌
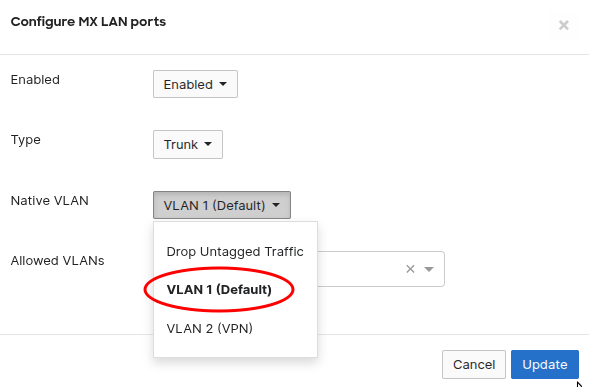
# Correct VLAN Configuration
Port 1-8: VLAN 1 (Default) ✅
After changing this setting across all ports, ethernet connectivity was immediately restored.
Lessons Learned: Building Resilient Networks
1. Hardware Redundancy Is Non-Negotiable
- Maintain spare networking equipment appropriate for your business size
- Don't rely solely on warranty replacement timelines
- Consider keeping emergency consumer-grade equipment for absolute emergencies
2. Understand Your Network's Critical Dependencies
- Document all configuration requirements (PPPoE credentials, VLAN settings, port forwarding rules)
- Test backup connectivity methods regularly
- Ensure mobile data modems are properly maintained and tested
3. VLAN Configuration Can Break Everything Silently
Modern networking equipment often ships with conservative security defaults that may not match typical business network expectations. Always verify:
- Default VLAN assignments
- Tagged vs. untagged traffic handling
- Port-specific VLAN policies
4. Vendor Lock-In Has Real Costs
While Meraki's cloud management is convenient, the inability to quickly source compatible replacement hardware during emergencies creates significant business risk.
Configuration Reference for Future Emergencies
Essential Network Documentation
ISP Configuration:
Connection Type: PPPoE
Username: [DOCUMENT_THIS]
Password: [DOCUMENT_THIS]
DNS Servers: [PRIMARY], [SECONDARY]
VLAN Settings:
Default VLAN: 1
Management VLAN: [if different]
Port Assignments: [document per-port requirements]
Critical Port Forwarding:
Service: [Port Range] → [Internal IP]
NAS Access: [External Port] → [Internal IP:Port]
Emergency Replacement Checklist
-
Hardware Inventory
- [ ] Spare router compatible with current configuration
- [ ] PoE switch or injectors
- [ ] Ethernet cables of various lengths
- [ ] Console cables for configuration
-
Configuration Backup
- [ ] Current router configuration export
- [ ] ISP connection parameters
- [ ] DHCP reservations and ranges
- [ ] Firewall and port forwarding rules
-
Testing Procedures
- [ ] Verify internet connectivity
- [ ] Test all VLANs and port assignments
- [ ] Confirm wireless access point connectivity
- [ ] Validate critical service access (VPN, port forwarding)
Conclusion: Preparation Prevents Panic
This three-day networking nightmare reinforced the critical importance of preparation in network administration. While we ultimately resolved every issue and restored full functionality, the business impact of extended downtime could have been significantly reduced with better emergency planning.
The combination of hardware failure, vendor dependency, and subtle configuration issues created a perfect storm that tested every aspect of our network knowledge. The VLAN configuration issue, in particular, demonstrates how modern networking equipment's security-first approach can create unexpected gotchas for administrators familiar with older, more permissive defaults.
Moving forward, we've implemented a more robust emergency response plan, including spare hardware inventory and comprehensive configuration documentation. Because the next networking emergency isn't a matter of if – it's when.
Have you experienced similar networking emergencies? What lessons did you learn from your network disasters? Share your war stories in the comments below.
Latest Articles

The 4 GB Card You Already Own Can Reason Now
June 17, 2026

The Small Model's Real Job Is Dispatch, Not Work
June 15, 2026
What a Native Tool Call Actually Is
June 15, 2026

Previous Article

Next Article
Feb 10, 2026
Comments (0)
Leave a Comment